
Introduction
As a self-hosting enthusiast, I try to replace as many services as possible with their self-hosted counterparts. I also try to avoid making the same mistake as many other self-hosting enthusiasts before me—running a setup without a proper backup solution in place.
I’ve been lucky enough not to lose any data (and from what I know, I’ve really been playing with fire, especially since I run some services on a Raspberry Pi with an SD card). But I’ve decided I don’t want to rely on luck. Instead of having 20/20 hindsight, I want 20/20 foresight.

The Setup
My setup is still pretty modest, as I’m still experimenting to achieve the right mix of hosted and self-hosted services.
I have a Raspberry Pi 5 that runs multiple services using Docker. I manage the Docker services using Docker Compose and Dockge. I’ve used Portainer in the past, and while I liked working with it, I found it to be overkill for a single-server setup.
Additionally, I have a Synology DS220+ NAS server that I use for real-time device sync using Synology Drive and as a media server using Jellyfin. Synology NAS is running in a RAID 1 configuration and uses Cloud Sync to store an encrypted copy of the data on a remote server for extra safety.
Both of the devices are on the same network, but I use Tailscale to connect between different machines as I like being independent of the network setup.
The Strategy
The plan is to do a daily backup of the data from the Pi to the Synology NAS.
I explored different options on how to effectively and, more importantly, securely backup the data. I first wanted to use rsync to copy the data from the Pi to the NAS, but I didn’t like opening the SSH port on the NAS.
The next best thing that came to mind was using NFS on a single shared directory, mounting it on the Pi, and then backing up the data to the NFS share.
I’ve set up a shared directory on the Synology NAS and created the following NFS rule for it:
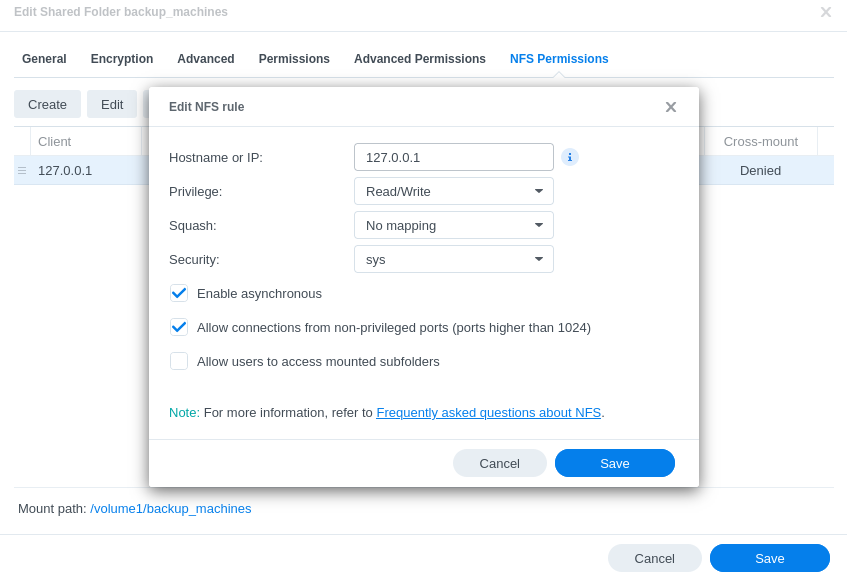
This config allows me to mount the directory through the Tailscale network (and not through the local network)
The two main “gotchas” in my setup are:
- Enable the “Allow connections from non-privileged ports” option.
I tried forcing the NFS mount to use a privileged port, but I was constantly getting “access denied” errors. I don’t have any proof for this, but I think it might be related to Tailscale modifying the network traffic. I decided to enable this option as the NFS share is only accessible through the Tailscale network, so it should be secure enough.
- Use
127.0.0.1as the client IP address if you try to connect through Tailscale.
At first I was using the Tailscale IP first and that failed. Then I switched to the local IP and that worked. I was pulling my hair out until I found this Reddit thread that pointed out that the Tailscale traffic goes through the loopback interface. Thanks, Internet stranger!
Now that I have the NFS share set up, I need to mount it on the Pi. I started by running the following commands:
# Create the mount point
sudo mkdir /mnt/backup
# Mount the NFS share
sudo mount -t nfs <tailscale-ip>:/volume1/backup_machines /mnt/backup
If successful, then no message is shown. You can confirm the mount by running ls /mnt/backup and seeing the files from the NAS or by running mount | grep nfs to see if the directory is mounted correctly.
Of course, we don’t want to run this command every time we restart the Pi. So I added the following line to the /etc/fstab file:
<tailscale-ip>:/volume1/backup_machines /mnt/backup nfs defaults 0 0In a perfect world, this would probably do the trick. But unfortunately, Tailscale once again adds a twist to the story. The Tailscale service is not started when the /etc/fstab is read, so the mount fails. The simplest solution I could think of is to add a cron job that runs the mount command after a reboot.
# Run crontab as root
sudo crontab -e

# Add the following line
@reboot mount -a
Fortunately at the point that this cronjob runs, the Tailscale service is already started and the NFS share is mounted correctly.

Perfect! We now have the NFS share mounted on the Pi.
Now, we need to copy the data over there. But where do we copy it from? For each of the services, I store the relevant data in Docker persistent volumes. They are technically available in /var/lib/docker/volumes, but it is generally not recommended to access them directly. So I once again dived in search of a better way to backup those volumes.
I came across this amazing project offen/docker-volume-backup which not only can backup volumes locally on a schedule, it can also gracefully shut down the containers before doing so to make sure there are no unfinished writes. It also supports features like notifications, backup rotation, and compression. Additionally, it’s compatible with different storage backends, making it easy to switch strategies—for example, to a remote server. And all of this with a simple Docker container. This is the whole Docker Compose configuration I use for it, not much more than the example from the project’s docs:
services:
  backup:
    image: offen/docker-volume-backup:v2.43.2
    restart: always
    env_file: .env
    volumes:
      # Binding the volumes to be backed up to the container directory being backed up
      - volume1:/backup/volume1:ro
      - volume2:/backup/volume2:ro
      - volume3:/backup/volume3:ro
      # Binding the Docker socket to the container to be able to gracefully stop the containers during the backup
      - /var/run/docker.sock:/var/run/docker.sock:ro
      # Binding the NFS share to the container directory where the backups are stored
      - /mnt/backup:/archive

volumes:
  volume1:
    # Marking as externals as volumes are created in other compose files
    external: true
  volume2:
    external: true
  volume3:
    external: true
I set it up to compress and backup the volumes to the mounted NFS share on the NAS every night with an e-mail notification if something goes wrong:
# Run the backup everyday at 3:30
BACKUP_CRON_EXPRESSION="30 3 * * *"

BACKUP_FILENAME="backup-%Y-%m-%dT%H-%M-%S.{{ .Extension }}"

# Compress the backup
BACKUP_COMPRESSION="gz"
GZIP_PARALLELISM=1

NOTIFICATION_URLS=smtp://...
NOTIFICATION_LEVEL="error"
Et voilà! We can manually trigger a backup to confirm it’s working:
docker compose exec backup backupAnd see the files on the NAS:

Summary
Even though it took me a while to set this up, I see this as a one-time investment as I had to learn a bit more about NFS and Tailscale. This setup works well now (remember to test your backups!) but I’m definitely going to explore other possibilities as I expand my homelab.